11 Nov 2014
Apologies for being slack with the previous few income reports (don't worry they weren't exciting), but there is a very good reason - I was working on my second game, Trichroma!
Several months back, I created a prototype of a game idea that was floating in my head and that game was called Connect Three. It was an ugly weekend hack and essentially a proof of concept for myself to see if my idea had legs.
After showing it to a couple of friends and getting great feedback the answer seemed to be "Yes, with some work this game could potentially get somewhere".
The "some work" turned out to be several months of work, lots of play testing and a better name.
I am proud to say that Trichroma is now available on the Play Store - you can get it right now!
For those who enjoy a good but simple puzzle game, I believe you will enjoy Trichroma. It was inspired by Threes, 2048 and Connect Four, but the gameplay and strategy is actually quite different!
For the devs out there who are reading this post, Trichroma is a Cordova app, therefore is written in HTML/CSS/Javascript and with Cordova magic is converted to a native Android apk.
Since it is a Cordova app, I can theoretically release it on other platforms (eg. iOS and Windows). However it is currently only available on Android mainly because I only own an Android phone. In addition, preliminary tests on the iOS simulator indicate that there still needs to be some work done to get it working on iOS - Corodva is powerful, but not *that* powerful!
If you're wondering if you should use Cordova for you next game, I would recommend it if you satisfy the following:
- Your game is simple
- You're familiar/comfortable with HTML/CSS/Javascript
- You're planning on releasing on multiple platforms
I plan on posting a few learnings from my journey in the near future, so keep an eye out for them :)
21 Jul 2014
June's income report looks very much like the previous months, no purchases and 97c from ads for the month.
|
Amount |
Note |
| In-app purchase |
$0.00 |
No purchases |
| Ads |
$0.97 |
607 impressions, 11 clicks |
Going to keep this one short as there's not much to say other than, yet another ~$1 month!
Another reason is that I have a second game in the works! From one of my earlier posts, you'll see a weekend adventure which resulted in "Connect Three".
My next game will be based on Connect Three with changes and improvements from input/feedback from friends. The prototype is looking promising... stay tuned!
15 Jun 2014
May's income report looks very much like the previous months, no purchases and 90c from ads for the month.
|
Amount |
Note |
| In-app purchase |
$0.00 |
No purchases |
| Ads |
$0.90 |
684 impressions, 15 clicks |
So far, there appears to be a pattern, roughly under a dollar per month from ad revenue regardless of the number of impressions or clicks.
Without having done any proper analysis or calculations, the main reason for this consistency seems to be that the active number of users have stayed roughly the same. I would assume if this number doubled, then the ad revenue would similarly double.
Another interesting factor is the length of time users spend on the game. If this increased, I wonder if the ad revenue would similarly increase. So far, all the ad revenue has come from actual clicks and not just impressions, so would more time in the game mean more possibilty for clicks?
Definitely easier said than done, but it would definitely be great to be able to try both of the above - increased installs/active users (will require more marketing and visibility) and increased time spent in the game (additional game play mode).
I do have an additional game mode in mind, though just need to actually get motivated and carve out some time to actually get the work done.
26 May 2014
This April report is super late, but better late than never right? So, just in time before the month of May comes to an end, here is the very familiar table.
|
Amount |
Note |
| In-app purchase |
$0.00 |
No purchases |
| Ads |
$0.91 |
869 impressions, 23 clicks |
Still no purchases, and roughly half the income compared to last month. The halving of the income didn't really come as a surprise to me, especially since I made a point to do essentially no marketing during April.
What did surprise me is the number of impressions and clicks are roughly the same compared to March, yet they only brought in half the amount. Upon further investigation, it's clear that the origin of the click is quite important.
For example, comparing the country with the highest number of clicks for the month of March and April. In March, I received 8 clicks originating from the United States and 13 clicks from India; however, the revenue was $0.71 and $0.28 respectively. Bit of maths shows that in this particular example means on average, the clicks from the United States are worth roughly 4 times more per click.
I'm assuming this is because advertisers are more likely to place a higher bid for countries which they think will give higher returns. The question now is, how to get more clicks from these "pricier" countries!
04 Apr 2014
Three months in and there has only still been the initial two purchases of Mr. Tiddles from the first month of release in January.
Although this is somewhat disappointing, but on the bright side, the ad revenue has seen a 3.6 fold increase! Unfortunately 3.6 times 49 cents isn't a alot, but it is improvement!
|
Amount |
Note |
| In-app purchase |
$0.00 |
No purchases |
| Ads |
$1.81 |
939 impressions, 20 clicks |
During March, I did not tweak any of the AdMob settings though did constantly tweet and promote the game via Twitter, Googe Plus and Facebook.
Promotion via social media helped a little - installs increased steadily, but only at approximately one a day. April will be an interesting month, as I plan on cutting down the social media promotion to see how it will affect the install rate.
I do have some plans to make updates to the game and possibly release it on the Samsung Store to increase downloads, however time is tight and procrastination is hard to avoid!
30 Mar 2014
Unless you've been living under a rock, chances are you've heard of 2048, a simple game where you slide to merge tiles of the same number and aim to get the elusive 2048 tile.
Despite it's simplicity, 2048 a very addictive game, and on Friday night I suddenly had an idea for a twist:
- Same sliding mechanics
- Coloured tiles instead of numbers
- Remove tiles by having 3+ in a row
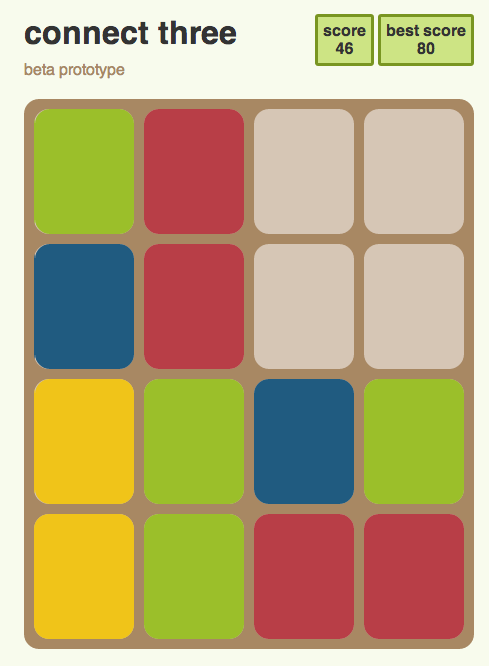
With this idea in mind, my weekend plans went out the window and most of it was spent prototyping the idea which would eventually be called connect three.
The easy path would've been to fork 2048 and make tweaks here and there, but that wouldn't be half as fun. So instead, decided to start from scratch!
Overall it wasn't as hard as I thought it would be - the CSS probably took nearly as much time as the logic/controls etc in JavaScript!
The game still needs quite a bit of polish. The first few things that came to mind (I'm sure there's more!)
- Some animations are really sudden
- Not completely satisfied with the colours
- Symbols of sorts so there is more than one way to tell the difference between tiles
- Score is currently linear - should give more reward for bigger combinations
- Clean up the code - most of it was written with 'just get something working'
- Styles off in Firefox (not tested in IE)
- Better name? Naming is hard!
Overall, quite happy with the result :)
Head over to http://dx3.psychopyko.com/connect-three/ to give it a go!
Edit: Not long after this blog, I was pointed to this blog post by Asher, one of the creators of Threes.
The blog post is essentially about all the thought and hardwork they took to come up with the final product and the various clones/rip-offs of Threes (which includes 2048).
Making Connect Three was probably more a learning process than anything (like most of my games actually), though I purposefully avoided numbers and merging to try and be different.
Lastly, I have said it is a 2048 inspired game simply because I haven't actually played Threes. Purchased and installed on my phone, but the game fails to load... time for a new phone!
08 Mar 2014
Towards the last few months of development of Mr. Tiddles, I borrowed a few phones from friends to test and make sure Mr. Tiddles would run as expected on different phones.
One problem which was not anticipated, but surfaced very quickly was that without root access, you do not have access to the /data directory on the phone - thus no access to view the xml file where shared preferences are stored.
The good news is, there is a way around this without needing to root the phone, and it is really simple :) All you need to do is run an extra command:
adb shell
run-as <package-name>
After the run-as command, you will then be able to access the contents under the directory: /data/data/<package-name>.
One thing to note is that your apk will need to be a debug build (ie. signed by the debug key or have debug flag enabled). This really isn't too much of an issue, especially when you're debugging. In fact, I find it's nice to know that the data of properly signed/built apks are not that easily visible.
So there you have it, a simple, non-invasive command to help you with debugging your Android app on any phone :)
03 Mar 2014
This is the second installment of my "Income Report" which details the revenue coming from Mr. Tiddles.
As you can see, for the month of February, there were no in-app purchases, though the ads did generate a bit more revenue. If you're on the ball, you'll notice that the number of impressions this month has actually dropped to 585 compared to the 868 impressions in January.
|
Amount |
Note |
| In-app purchase |
$0.00 |
No purchases |
| Ads |
$0.49 |
585 impressions, 4 clicks |
A reasonable guess would be that there were less people playing, however, this is not the case. In fact, due to my attempt to spread the word of Mr. Tiddles as much as possible halfway through February, the number of users actually increased.
So, why did the number of impressions decrease? Well, during most of January (and first half of February) I actually had the Refresh Rate set at 30 seconds. After doing some research into AdMob and mobile ads, it was clear that in general, a longer refresh rate is better. Therefore, I increased it to 90 seconds.
A quick summary for the reasoning behind a longer Refresh Rate is that it increases the chance a player will see and click an ad. Additionally, it will likely increase your Impressions CTR percentage as the denominator (ie. impressions) is smaller.
My attempt to increase the visibility for Mr. Tiddles seemed to work relatively well - not fantastic, but not bad either. Three main actions that I took were:
- Created a dedicated twitter account: @MrTiddleGame
- Created a facebook page: dx3 studios
- Kept badgering friends about Mr. Tiddles :)
If you're feeling nice, follows, retweets, likes, comments, shares, +1s etc are all very appreciated :D
12 Feb 2014
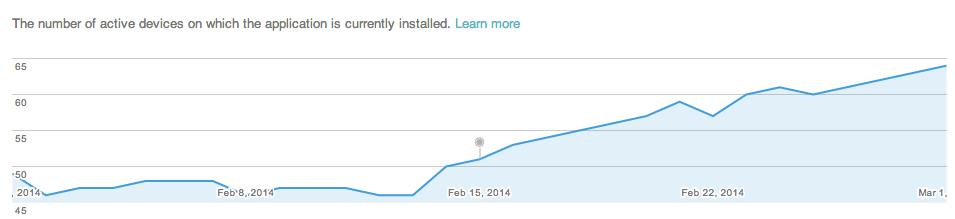
Roughly 6 weeks ago, my first Android game Mr. Tiddles was released into the wild. So now I think it is time to have a look at some stats!
To keep things simple, the below numbers are before tax and before Google takes their 30% cut.
|
Amount |
Note |
| In-app purchase |
$2.11 |
Two purchases |
| Ads |
$0.08 |
868 impressions, 2 clicks |
Unfortunately, unlike Flappy Bird, instead of the rumoured $50k a day *dreams*, it is a humble $2.19 for the month - with Google and the tax-man stil to take their share.
Honestly, I was actually expecting more, but I guess it is a start. Sadly, the number of new/active users seem to have plateaued so realistically the expected report for February will probably look even sadder.
One of the ways to increase the app's potential income would be to increase the number of users. To increase the number of users, I will need to make an update of the app and/or do some form of marketing and hope that more users will leave reviews for the app.
If you have any ideas, let me know at @dx3droid - I'm all ears!
Of course, if you download Mr. Tiddles and give it 5 minutes* of play time, leave a nice review, share with friends etc you will make me super happy :)
*completely unrelated to the game, but definitely a recommended read
15 Jan 2014
Two weeks ago, I released my first Android game: Mr. Tiddles. As with any sizeable project, there was much to be learnt, both technical and non-technical.
In this post, I'll talk about the three main non-technical points I picked up along the way.
1. Just do it
Despite wanting to make a game for a long time, it was only about a year ago that I actually sat down and really started. Before that, I had a long list of reasons as to why I couldn't do it: not enough time, sub-par skills, and so on. You get the idea.
However, I soon realised that I'll never be ready enough, and that time can be taken back one website and one TV show at a time. So one day, I decided enough was enough. I sat down and started with the simple goal of getting an image displayed on the screen.
What I discovered that day is: just do it. Start with your idea, get something on the screen, move it, tweak it and slowly iterate so it becomes closer what you have in mind. You will learn a lot this way. A lot more than reading, researching and trying to learn everything. Better yet, you'll have something to play with, so you can give your ideas a reality check.
2. Test, test and test some more
Once you have something that works, even partially, ask a friend for their opinion. The graphics don't have to be perfect (or even decent), nor does the game have to work from end to end; as long as the core idea is there, that's enough. What you want is people's feedback. More than likely, you'll be surprised at how differently someone interprets what you think is super obvious or easy.
Be warned, the feedback you receive will likely frustrate you and might even go directly against what you have in mind. If this is the case, you need to ask yourself "Why?". Don't jump in with a hasty fix, but determine what the root of the problem is. Keep making improvements, keep testing and if you still receive the same feedback, it might mean the mechanic doesn't work or you still haven't got it quite down pat yet.
Even after you've got something that more or less resembles what you have in mind, you should still continue to test it. By now you probably know the game inside-out, so you need someone to provide you with a fresh perspective. Is it too hard? Too easy? Is the menu and flow of the game intuitive? Do people understand what's going on?
3. Be prepared to change and leave out stuff
Depending on the feedback, be prepared to change your initial concept of the game. Sometimes, what you think is a great idea might not be as great as you think. It might just need a small tweak, or it might need a completely different approach.
Secondly, set yourself a reasonable deadline and stick to it. This means, be prepared to leave features out. More than likely, you'll have lots of ideas and features that you would like to be in the game. But as the deadline draws near, be honest with yourself: Does the game really need that feature to work? If not, consider leaving it out.
Personally, I think one of the most important things for your first game is to actually finish and release it. In order to achieve this, don't be afraid to leave parts out of the first release. You can always release updates with more features!
01 Jan 2014
After many months of hacking away at the computer, learning to use Gimp and Inkscape, cursing at Google's horrible in-app billing testing environment, and general game dev stuff... my first game, Mr. Tiddles is now available on the Google Play Store!
It's a simple game in all aspects, but I'm still happy with the result. The main goal for this game has been achieved - create a game, finish it, and make it available on the Play Store for all to enjoy!
Throughout the process, I have learnt many many things - some which I have started to blog about, others which are still blog posts yet to be written.
So, if you feel like playing a simple game on the first day of 2014, head over to the Play Store and give Mr. Tiddles a whirl :)
25 Dec 2013
Few months ago, I started working on the menus for Mr. Tiddles and very quickly found the amazing ImageTextButton that comes with libgdx. It is basically exactly what I needed: a button composed of an image and a label.
The default configuration is image on the left and text on the right which worked perfectly for the main menu. However, due to space/position, for the end game screen, I needed a button with the image on top and text below.
After quite some struggle, lots of hacking, and even a pull-request to the libgdx repository, Nathan Sweet showed me how it can easily be done.
Since I don't recall finding the solution documented, here it is below. Hopefully it will save you several hours when you are in need of a vertial image text button, or an image text button with some funky layout configuration.
// Creates a button with image on top and label below
ImageTextButton shareButton = new ImageTextButton("share", shareButtonStyle);
shareButton.clearChildren();
shareButton.add(shareButton.getImage()).row();
shareButton.add(shareButton.getLabel());
As you can probably guess, the 'magic' is in clearChildren() as you are now able to re-add the elements of the button in whatever configuration you need. When you want to create a new row for the next elements, simply use row() and they will appear under the previous items.
Merry Christmas and happy button making :)
21 Dec 2013
For my first game, Mr Tiddles, I decided to add achievements via Google Game Services. One of these achievements is "Finish game with a prime score".
Prime numbers are natural numbers greater than 1 that are only divisible by 1 and itself. The easiest most straight-forward way to check if n is prime:
private boolean isPrime(int n) {
    if (n == 0 || n == 1) return false;
    double limit = Math.sqrt(n);
    for (int i=2; i <= limit; i++) {
        if (n % i == 0) return false;
    }
    return true;
}
This will definitely work, but if n is a large prime, it would have to iterate through a lot of numbers before coming to a conclusion. Good news is, there is a better and more efficeint way!
A quick Google search reveals a Wikipedia page on Primality tests. There are many methods/approches listed there, I gravitated towards one particular description under Naive methods.
All primes (except 2 and 3) can be expressed as 6k±1 for some integer k
This blew my mind away. I had never thought of prime numbers this way. Despite the explanation making sense, I still had to double check with a handful of prime numbers - of course the statement held true :)
Although this approach is not the most efficient, I chose it because I could actually understand it and felt it would be easy enough to implement. So, a more efficient way of determining a prime is as follows:
private boolean isPrime(int n) {
    if (n == 0 || n == 1) return false;
    if (n % 2 == 0 || n % 3 == 0) return false;
    double limit = Math.sqrt(n);
    for (int k = 1; 6*k-1 <= limit; k++) {
        if (n % (6*k-1) == 0 || n % (6*k+1) == 0) return false;
    }
    return true;
}
14 Dec 2013
After much neglect, I am finally going to make an effort to blog semi-regularly about random Android stuff, in particular development. The first step (completely unecessary, but so fun) was to migrate the blog from WordPress to Jekyll :)
For the curious, the two posts from 2011 were migrated from the old blog to here as I felt they still had value and would be useful. Hopefully, there will be many more useful/interesting blog posts to come!
08 Jun 2011
A bit more than one week ago, I published my first app on the Android Market :) All in all it all went well, but as with all things it wasn’t without drama!
In this post, I’ll talk a bit about the parts of the AndroidManifest.xml file that I found relavant to publishing an app.
Here is my AndroidManifest.xml:
 1 <?xml version="1.0" encoding="utf-8"?>
 2 <manifest xmlns:android="http://schemas.android.com/apk/res/android"
 3          package="com.psychopyko.dx3.tpgmonitor"
 4          android:installLocation="auto"
 5          android:versionCode="6"
 6          android:versionName="0.8.5-beta">
 7
 8    <uses-permission android:name="android.permission.INTERNET"/>
 9    <uses-sdk android:minSdkVersion="4"
10              android:targetSdkVersion="6"/>
11
12    <application android:label="TPG Monitor"
13       android:icon="@drawable/ic_launcher_tpg"
14       android:name="com.psychopyko.dx3.tpgmonitor.MyApplication">
15
16       <!-- activity definitions here -->
17
18    </application>
19 </manifest>
Let’s look at the manifest tag first, there are four elements of interest, starting with what I consider the ‘trickiest’.
package="com.psychopyko.dx3.tpgmonitor" (line 3)
This element has two purposes. Firstly, all your code should live in this package, ie. your package names at the top of your .java files should be something like:
package com.psychopyko.dx3.tpgmonitor;
Secondly, and probably more importantly, when you publish on the Android Market, this name that determines how your application will be identified, and where it will be in the market (ie. what the URL will look like). Here is the URL to my TPG monitor on the Android Market:
https://market.android.com/details?id=com.psychopyko.dx3.tpgmonitor
The id is unique to every single app across in the Market. So, if I was to make another app, I may put something like: package="com.psychopyko.dx3.awesomegame" and you it will appear in the market as:
https://market.android.com/details?id=com.psychopyko.dx3.awesomegame
The important thing to note here is once you’ve uploaded an apk with package name you’re stuck with it. If you made a mistake, you can’t re-upload it to fix the package name. You will need to first unpublish the incorrect app (so people won’t be able to see it) and then create a "new" app with the correct package name (yep I stuffed up the first time, that’s how I know).
I haven’t tried, but I would guess that if later in the future you decide you do want to use package name, you’ll have to upload another apk over your initial "mistake" and publish it for the world to see.
android:versionCode="6" (line 5)
This element is the way to determine if one version of your apk is newer or older than another. It has to be an integer, where the higher the number the newer the version. This number isn’t shown to users at all. Remember to bump this number every time you make an update!
android:versionName="0.8.5-beta" (line 6)
This element is simply a pretty version name for your app, this is what your users will see. It appears in the "Current Version" info on the Market, when users download a new update and in "Application Info" on the phone. It’s really just a pretty name, but still a good idea to name it properly so users won’t get confused. (There isn’t a strict convention or rule for version names, but there are some guidelines regarding versioning)
android:installLocation="auto" (line 4)
This element allows you to move your app to the SD card (Android 2.2+). There are three valid options:
- internalOnly (default)
- auto
- preferExternal
As the names suggest, if you specify #2 or #3, your app will be able to be installed on the SD card. If you don’t specify this attribute, or specify "internalOnly" your app cannot be moved to the SD card. Unless there is a specific reason why your app must stay in the phone’s internal memory, I would suggest let users choose where they want their app to be stored (ie. specify "auto" or "preferExternal")
Ok, that’s pretty much about it for the manifest tag, now let’s have a look at the next three tags uses-permission, uses-sdk and application.
<uses-permission> (line 8)
This here lets Android know what permissions your app needs in order to work. In my case, the TPG Monitor is a fairly simple app, so all I needed is the Internet, so that is all I have defined. In my opinion, it is best to have as few permissions as possible – that way your users won’t need to wonder why your app is asking for permissions x, y, z. There are of course, many other permissions, and you might legitimately need them if your app does fancy cool stuff.
<uses-sdk> (line 9-10)
This tag will allow you to define your "minSdkVersion", "maxSdkVersion" and "targetSdkVersion". The value you specify is an integer that corresponds to the API Level (eg. Froyo = Android 2.2 = 8). Firstly, I would suggest not to define "maxSdkVersion" – there is no reason why you would want to restrict your app from future releases of Android OS. The reason I defined "minSdkVersion=4" (Donut) is because of permissions. My app runs fine on Cupcake (Android 1.5, API Level 3), however, due to a bug in Android 1.5, even specifically only specifying the permission "INTERNET", Cupcake will request for two additional permissions: "WRITE_EXTERNAL_STORAGE" and "READ_PHONE_STATE". So given the small % of users on Cupcake and my dislike of my app asking for two additional permissions, I made the decision to not support Cupcake and have my app only ask for the one permission it needs.
<application> android:label & android:icon (lines 13-14)
These two will simply define the name and icon that is displayed to the user. The name should really be in your strings.xml, so it can be internationalised (but I felt lazy) – it is what you want to call your app. For example, it is the label that appears under the icon on your phone. The icon should be a png (three separate png files actually) that lives in the "drawable-ldpi, drawable-mdpi, drawable-hdpi" directories under the "res" directory. The filename is the same as what is defined in the xml file (so my icons are all called: iclaunchertpg.png). If you’re wondering what’s the deal with ldpi/mdpi/hdpi it is to cater for the various screen types of Android phones – Android docs provides a fairly comprehensive icon design guideline.
So there you have it, my not so short summary of things in AndroidManifest.xml related to publishing on the Market that I found important. There are of course a whole host of other elements and options that you can include in your manifest file, but so far I haven’t found the need to look into them – they seem to either have sensible defaults, or not be that important. If there is something I missed, please tell me :)
18 May 2011
So, you’ve been working endless nights trying to get your app up and running and you’re nearly there. Most things are working; but it’s just not quite ready to be released into the Play Store; but you want people to see what you’ve done so far, or give people a teaser for what to expect. That’s the situation I’m in right now!
The question is.. how do you take a screenshot of your Android device/emulator? First thing that comes to mind is, take a normal screenshot with the image cropped at what you want, but there has got to be a better way right? Yep indeed there is – use the "Android Device Monitor". From the all knowing android developer guide:
Android Device Monitor is a stand-alone tool that provides a graphical user interface for several Android application debugging and analysis tools.
So, how do you use the Android Device Monitor to take a screenshot? Follow the steps below (note, they are Mac specific but I would imagine if you have your android dev environment set up properly, it should also work for Windows)
- Connect your device/launch the emulator
- In terminal type:
monitor (you may need to update your Android SDK)
- Click on your device/emulator
- In ‘Devices’ panel, click on the camera icon
- You should now see a new window screenshot of your device/emulator which you can now save as a png
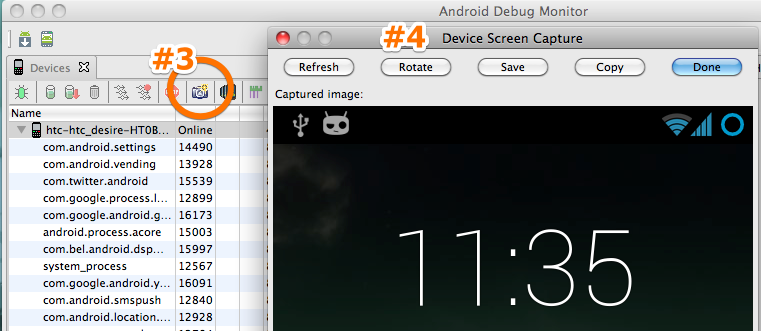
Note: I've updated this post. The old method (which still works) is to use the Dalvik Debug Monitor Service (DDMS). If you don't have 'monitor' available in your version of the Android SDK, you can achieve the same results, but in Step #2, type 'ddms' and under the 'Device' menu you should find the 'Screen Capture' option.

